In this guide, you’ll learn how to find a profitable niche for your blog. Then, you’ll also learn how to perform keyword research. Not only that, but this article also covers a high-level guide to building a website for your blog. Finally, you’ll learn how to write keyword-optimized content. To learn more, read on…
How to Start a Successful Blog – Step 1: Find a Profitable Niche
The first step to starting any successful business, including blogging, is to find a niche that is in high demand but relatively low competition.
When I say niche, I mean an area that appeals to a specific set of people. In the first paragraph of this section, I highlighted 2 phrases: high demand and low competition. If you find something that many people need but few people offer that service, you have hit the jackpot! The same logic applies to blogging. If you find a content niche that people are searching for but few websites have written about, you have found a good blog niche. The next logical question is “but how do I do this?” The next 2 subsections answers this question.
How to Come Up with a Niche Idea
The first step to come up with a blog niche idea is to write down a list of the things you love. Then, write down the kind of information you search for. Finally, write down a list of your existing skills. Once you have listed your interests and skills, the next step is to check which of them is in high demand but reasonably low competition. To perform this task, you need a tool called Ahrefs. Unfortunately, Ahrefs is NOT FREE. If you are serious about starting a successful blog you have to be ready to invest!
How to Use Ahrefs to Test Your Niche
To use Ahrefs to check your ideas: The next step is to review the exported CSV file for the searches that have high Volume but low KD (Keyword difficulty). I look out for keyword phrases with Volume in the range of 3,000+ monthly searches. If you identify a set of these keywords, you have found your blog niche idea!
How to Start a Successful Blog – Step 2: Perform Keyword Research
I will start this section by repeating what I said earlier in this guide: the secret to successful blogging is to find keywords that a lot of people want to read about but not so many bloggers have written keyword-optimized content about that topic. Before, I proceed, let me clarify what a keyword is.
What is a Keyword?
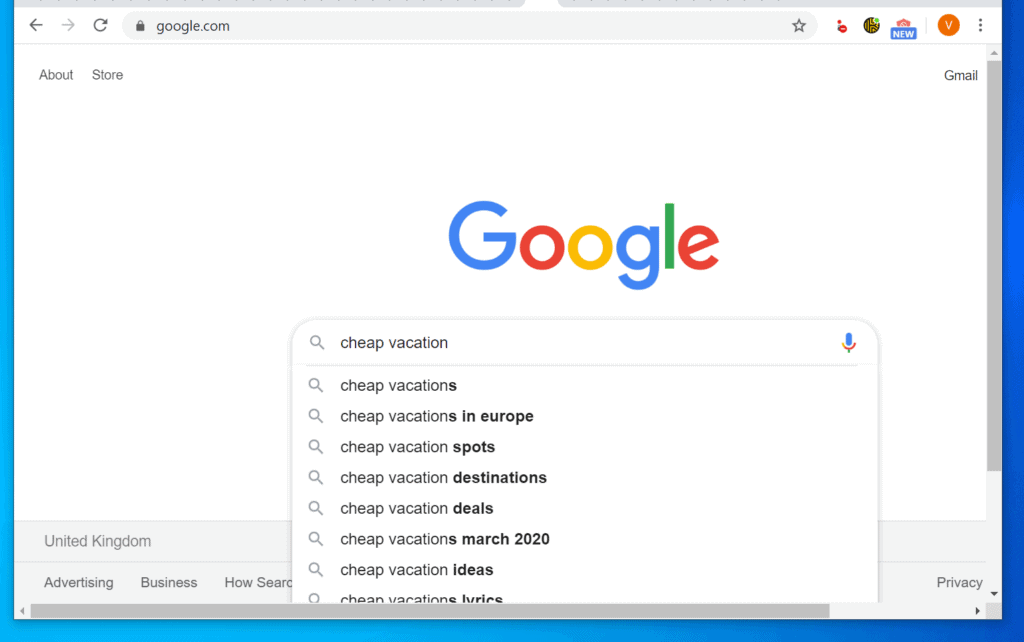
A keyword or keyphrase is a phrase that a user types into a search engine with the purpose of finding specific information. The searcher may be looking for a product or information about something. As an example, say I want to plan my next vacation but I am not sure where to go. I also have a limited budget. I could start by entering the keyword “cheap vacation” in Google.com or Bing.com. When I start typing cheap vacation the search engine will auto-suggest what it thinks I want to search for. This is called keyword auto-completion. From the example in the image below, even though I entered cheap vacation, the search engine is suggesting cheap vacation in Europe, cheap vacation Sports, cheap vacation destinations… Now, if during your initial niche research, you have concluded that writing content about travel is something you want to include in your blog, you may want to find out all the keywords related to travel that customers are searching for. This is where you start your keyword research – create a list of words or phrases that are related to your niche. These initial words or phrases are called seed keywords.
How to Generate Seed Keywords
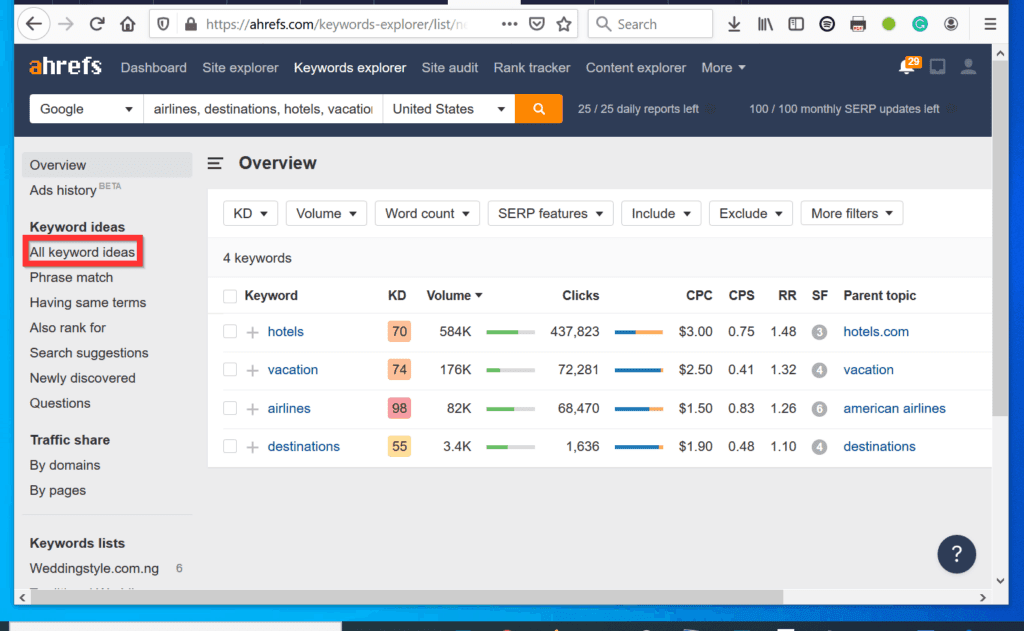
In step 1 of this Itechguide, I discussed How to Come Up with a Niche Idea (section opens in a new browser tab). The same principle applies here. The only difference is that at the niche research stage, your list could include anything. However, at this stage of your keyword research it is now limited to your identified categories. To expand on this idea, assuming I want to create a travel blog, and I have identified the following categories: Vacation Destinations, Best Of. I may break by sub-categories as shown in the table below… Using my sub-categories, I will come up with the following seed keywords: vacation, destinations, airlines, hotels. Now that you know how to come up with seed keywords, develop a full list of as many seed keywords as you can think of. In the next sub-section, I will shed some light on Ahref subscriptions and its limitations. In the subsequent sub-section, I will share some tricks on how to maximize your subscription without breaking your bank account. Finally, I will conclude step 2 of “how to start a successful blog” guide by teaching you how to perform keyword research with Ahrefs.
How to Perform Keyword Research From Competetors
In the last sub-section, I discussed how to perform keyword research using “seed keywords”. In addition to performing keyword research with “seed keywords”, there is another method to performing keyword research – by “spying” on your competitors. From my experience, performing keyword research using by “spying” on your competitors is better. How does this work? You start by listing all your competitors. The best way to find your competitors is to perform a search on Google. For example, if you’re creating a travel blog, you can search for keywords related to travel. One easy way to get these keywords is to refer to your research in the last section. Once you have listed as many competitors as you can find, then, you move to the next stage. Login to Ahrefs, then on the top menu, Site Explorer. Once Site Explorer opens, enter the first website in your competitor’s list and click search. Then, on the left of the result page, click Keywords. Finally, use the filtering tools to filter out keywords you want or do not want to see. For example, if you want to see a list of keywords that includes “how to”, enter “how to” in the “include” filter tool. Another example is “what”. Keywords that include “what” are very helpful as they clearly define the searcher’s intent – they are asking a question. Once you have completed your filtering, export the keywords as an Excel file. Then, enter the next website and proceed as described above. When you finish “spying” on your competitors using Ahrefs, create another excel sheet. Then, open each of the excel sheets you exported, go through each and compile similar keywords into a separate worksheet in your new keyword excel sheet.
Understanding Your Ahrefs Subscription
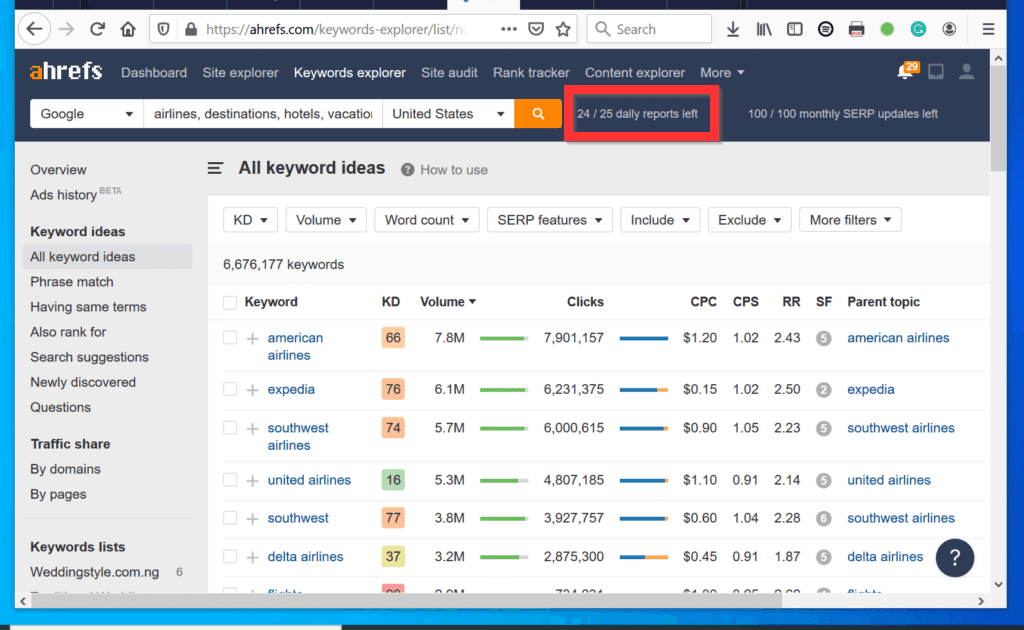
Understanding how Ahref’s subscription works is key to making sure that you optimize the subscription. To begin, open https://ahrefs.com/pricing. Here is a screenshot of the page. If you purchased the Lite subscription, you will be able to perform 25 searches per 24-hour period. A search is counted when you enter a seed keyword in Ahref’s search box and click search or press enter. In the image below, this is displayed as Reports per day Another important and useful piece of information about the subscription is the Rows per report. When you perform a seed keyword search, you need to export the report to CSV (more on this in the next section). With the lite subscription, you are allowed to export up to a maximum of 1,000 rows. From my experience, the limit of of1,000 rows per report is more than enough. The reason is this: for most reports, you have to filter out irrelevant results – leaving only what you really need. There are other limitations of the Lite subscription but these 2 are the most relevant to you. They also impact your ability to research the most. Other limitations do not affect you much. The only limitation worth mentioning is the SERP position history (not shown in the image). Lite gives you 6 months’ history but as I said earlier, the impact of relevance to keyword research is very limited.
How to Maximize Your Ahrefs Subscription for Keyword Research
Finally, for step 2 of “how to start a successful blog” guide, here is how you perform keyword research to maximize your subscription.
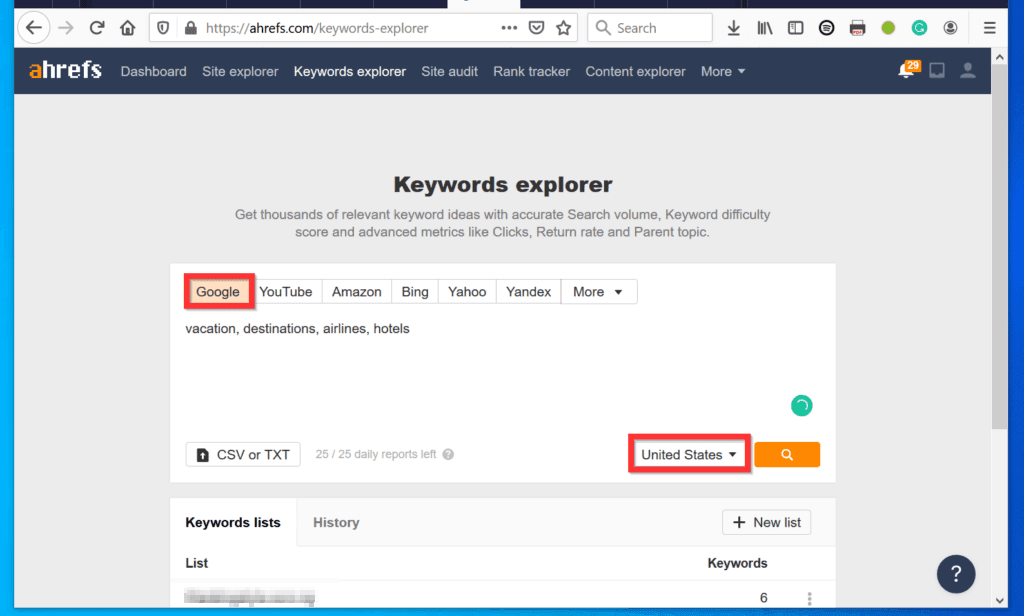
Sign in to Ahrefs. Then, on the menu click Keyword Explorer.
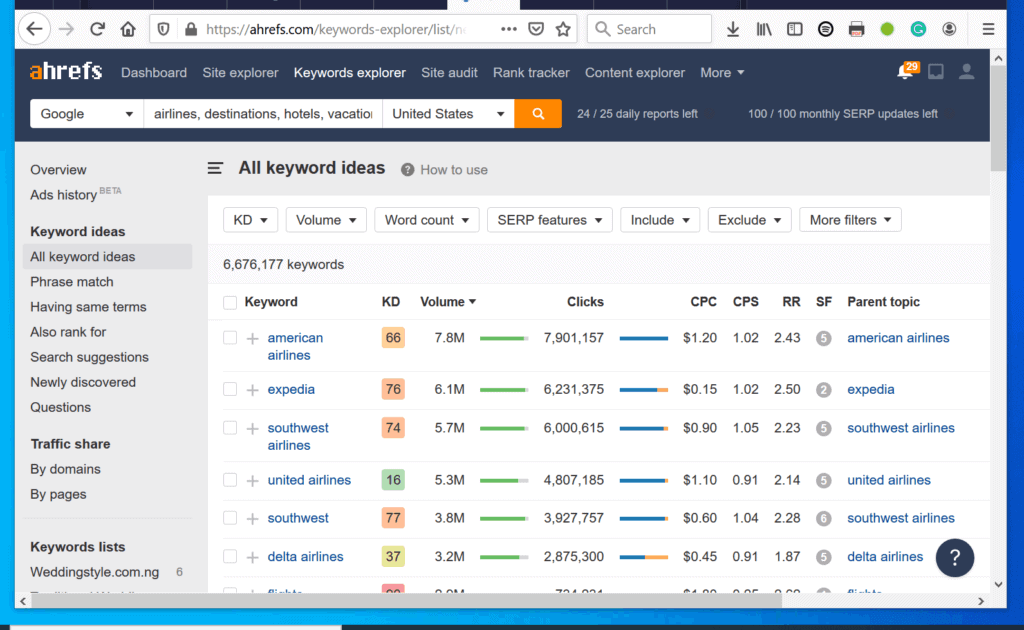
When Keyword Explorer opens, Google will be highlighted by default. Enter your seed keywords in the box (separated by comma). Then, on the bottom right, confirm that *United States is selected and click Search.
The result will display with the Overview tab. To unleash the keyword ideas, on the left pane, click All keyword ideas.
How to Start a Successful Blog – Step 3: Build Your Website with WordPress
Once you identify your blog niche, the next logical step is to build your website. With the information you gathered from step 1, decide your domain name – someName.com. Unless you want to build a blog to target a specific country, I recommend you register a .com domain name.
Register a Domain Name
The next step is to register a domain name. To start a successful blog, I recommend that you register your domain for a minimum of 5 years. *Registering your domain for this long contributes to improving your search engine ranking. I can confirm that when I registered Itechguide.com for a minimum of 5 years, I saw a considerable jump in the Google search ranking. As of today, Itechguide.com is registered for 10 years – this is the max offered by Godaddy. Still, on domain name registration, I recommend Godaddy. The reason is that I have used more than 4 registrars – Godaddy is one of the few registrars that allow you to register your domain for up to 10 years. Another great registrar is NameCheap.com. NameCheap.com also offers domain name registration for up to a maximum of 10 years. Finally, to help you with domain name generation/suggestion, read How to Choose a Domain Name. For steps and options to register a domain name, read How to Register a Domain Name.
Buy a Shared Web Hosting Plan
Once you have registered a domain, the next step to start a successful blog is to buy a shared web hosting plan. For this, I recommend SiteGround.com. Up until I needed to move to a VPS hosting plan, I hosted itechguides.com with SiteGround. To power your blog to succeed, I recommend SiteGround’s GoGeek.
Buy an Affordable Cloud Hosting
A shared web hosting is a common option for most new bloggers. However, Cloudways.com has a very affordable starter cloud hosting plan for $10/month. This is my recommended option as it will be easy for you to upscale as you grow. For help you with hosting your website read How to Host a Website. You can also read Shared Web Hosting Explained.
Plan and Build Your Site
The final step in this section is to plan and build your website with WordPress. I recommend WordPress because it is one of the easiest tools to learn. WordPress also has a lot of Plugins to help you customize your website.
Get What You need
To be able to build a website to start a successful blog with WordPress you need some tools. The table below is a list of all you need, what you need them for and what they will cost you. *You can install as a free plugin but you lose a lot of benefits.**Ahrefs requires you to pay a monthly subscription but there is a way to avoid this. In addition to the costs listed in the table, you also need to plan for the cost of registering your domain and purchasing web hosting. If you are registering your domain with Godaddy, it costs an average of $11.99 for the first year. If you registered the domain for 5 years, it will cost about $59.95. For web hosting, if you purchased GrowBig from SiteGround, it costs $9.99 per month ($143.40 for the first year) Putting all the costs together, to pay for all you need to start a successful blog for the first year, you will need a total of $1059.16. Alternatively, if you exclude *Wordfence Security Premium, **OptinMonster, **SocialRabbit, Easy Updates Manager, WP Rocket and *MonsterInsights Premium you will require a minimum of $489.36. *To start, you can install the free versions of these plugins and plan to purchase the premium version later. **These plugins/tools are essential but you can decide to purchase them later on.
Plan Your Blog/Website
Once you have put all you need together, the next step to start a successful blog is to plan your website. The first thing you need to plan is your blog categories. Your categorization will depend on your findings from the niche research. Once you list your categories, decide and list the sub-categories for each category. With your categories and sub-categories sorted, you now have to plan your menu. Your menu will usually follow your categories and sub-categories. Finally, plan to add the following pages: Homepage, About Us/Me, Affiliate Disclosure, Terms & Conditions, Disclaimer, and Privacy Policy.
How to Start a Successful Blog – Step 4: Write Keyword-Optimized Contents
So far, this Itechguide has covered the following: Step 4 teaches you how to write keyword-optimized content. In writing keyword-optimized content, it is important to bear 3 things in mind
General Content Guidelines
Before I give you a list of writing guidelines, I like to mention that any content is made of 3 main sections: Introduction, body, and conclusion. The introduction, as the name implies, introduces the content. In order not to bore your readers, I strongly recommend that you keep your introduction to a maximum of 4 paragraphs. Later in this section, I’ll give more details about what you should have in your introduction. Once you have introduced your content, you go straight into the body of the content. The body of an article contains the information you wish to share with your audience. Once again, to make reading your content easier and fun, it is important to section the body of your content with H tags – more on this later. Finally, once you have shared all you need to share in the body of the article, you write a conclusion. Now to the main juice of this section – here is a list of general guidelines you should apply when writing your content. Finally, to help you write excellent content, it is important to start by developing a writing template. If you’re wondering, a writing template defines what your content looks like. When I first started writing, I did not use writing templates. One problem you will face if you do not create a writing template is that you spend too much time wondering what to write. On the other side of the argument, if you create a writing template before you start writing, writing becomes easier. The reason for this is that your writing template defines what you should have on each section. In addition to defining what to include in each section, a writing template defines how many paragraphs you should have in each section. Not only that, but a writing template also defines what each section of your content should cover. Before I go further with writing templates, let me also point out that you should not use a one-template-fit-all approach for your writing templates. What do I mean by this? I am glad you asked! In the How to Generate Seed Keywords (link opens in a new browser tab) section of this article, I discussed how to categorize and sub-categorize your blog. Based on your blog categorization, you will need to create a writing template for each category. To continue with my example from the How to Generate Seed Keywords section, here is a table I used for that section. So, based on this table, I’ll create a writing template for Vacation Destinations articles. In addition to that, I’ll also create a writing template for Best Of articles.
How To Create Writing Templates
Now that I have covered the bits about writing templates, I will share some information about how you can create one. Your writing template should start by defining what should be in your introduction. For example, you may decide that the first sentence in your article will be a question. Then, you decide what information the sentence should pass. Remember that the first paragraph of your content MUST include the target keyword. Once you’re done with the first paragraph, define what to include in your second and third paragraphs. To make it easy for you, you may simply inform the readers what to expect from the body of the article. Finally, define what you should have in your last paragraph. The idea is to keep your visitors reading the article to the end. Therefore, it is important to use the introduction to “entice” your readers. Once you’re done defining the introduction, move on to the body of your article. In this section of your writing template, you will answer the following questions: To give an example, let’s say that I’m developing a writing template for Vacation Destinations articles, I may define the following in the body of the template: The whole idea behind creating a template is to define what you’ll include in each section. You should make it as detailed as possible. Moving on, once you have defined what should be in the body of your content, your next stop is the conclusion. Like the introduction, the conclusion should summarize what the article has covered. Finally, your conclusion should include any call-to-action you want your readers take. To give you an idea how a conclusion should look like, the remaining paragraphs of this article are the conclusions. Starting a successful blog is no rocket science. However, you need some basic skills as outlined in this article. For starters, you need to figure out a profitable niche. In addition to that, you also need to perform keyword research. Once you have completed the keyword research bit, it is time to build your website. However, before you get down to actually building the website, there are some preliminary tasks. For example, you need to register a domain name, decide on a hosting plan. Finally, once you have your website up and running, it is time to get down to the business of writing! I hope you found this article helpful? If you found the guide helpful, kindly vote Yes to the Was this post helpful question below. Alternatively, you may use the “LEAVE A REPLY” form at the bottom of this page to give us your feedback or ask a question. You may also share your experience with starting a successful blog. Finally, you may find other articles on our WordPress & Websites How-Tos page helpful.