Windows 10 is the latest operating system from Microsoft. It has neat and clean user interface featuring Segoe UI. The Settings app, File Explorer, Apps, and all other things that are part of Windows 10 features Segoe UI font. It is an elegant and clean font. Still, some users want to change windows 10 default font with one of their choices. In earlier versions of Windows 10, there is a setting using which users were able to change default system font just by making few clicks. But the same functionality is missing in Windows 10. The situation becomes worse when you don’t even find a single third party software or app for doing the same thing on the internet. Maybe in future Microsoft might add this functionality to the Windows 10 operating. But for now, the truth is that there is no settings or option available to change default system font in Windows 10. But that does not mean that you can not change it. A simple registry tweak can help you in overcoming this limitation.
How to Change Windows 10 Default Font
So if you’re not a great fan of Segoe UI and want to change it to something which you think will look better? Check out a workaround in upcoming lines:
- Open a new notepad or text document. For that, make right click on the desktop and select New -> Text Document. I guarantee you, if you follow each step correctly, you will able to easily change windows 10 default font.
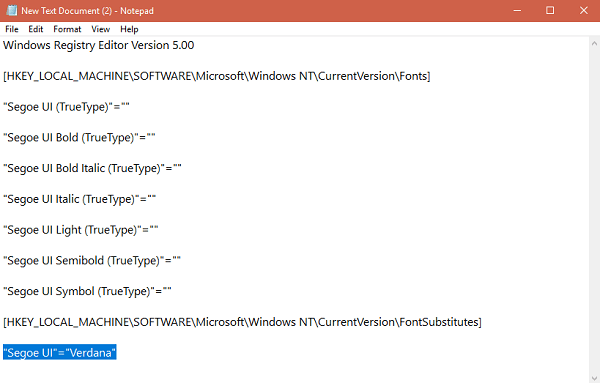
- In the notepad file, you need to paste few lines of the code. Download it from here After pasting the code into the notepad file. You need to scroll down until you find the line which reads “Segoe UI”=”Type your font here” just like shown in the below screenshot.
- Here in this line, you have to replace “Type your font here” with the name of the favorite font which you want to replace with default Segoe UI. I want to change it with Verdana font. So after changing the code, the look will read “Segoe UI”=”Verdana” and the whole code will look like:
- Now click on File -> Save as.
- Here in this window, you need to save the file with .reg extension. You can name it whatever you want is convenient. I have named it font.reg. Select the location (I prefer desktop) where you want to save it and click on the Save button.
- Now you will get a registry file with name font.
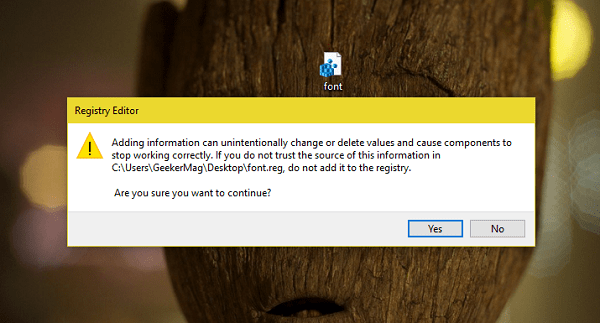
- Double click on this registry file and when UAC dialog box appears, click Yes to continue. After that, another Registry editor warning dialog box will appear just like shown in the following screenshot. Here click Yes to continue.
- At last, you will see another dialog box. Just click on OK button. It is telling you that registry added successfully.
- To apply the changes you need Signout from a current user account or Restart or Reboot. For that, right click on the Start button “Shut down or sign out” – > “Signout or Restart.“ Note: If you don’t Signout or Restart, the font will not change. You can check video tutorial on how to change default system font in Windows 10 for a bright idea:
Restore System Fonts to Default (Segoe UI)
At any point, if you want to change the font current font to default font for Windows 10, i.e., Segoe UI, then you can also achieve that thing. For that:
- Download the zip file from this link.
- Extract Restore default registry file from the zip file.
- Double click on the same registry file. Again you will see UAC dialog box, Click Yes. After that Registry Editor warning dialog box will come up, click Yes. At last Registry Success message, click OK. Don’t forget to Signout from a current user account or Restart. That’s it! I hope you find this article on how to change Windows 10 default font useful. Why don’t you try this and let me know if you need any assistance? Also, don’t forget to tell what font you like to replace Segoe UI.


