The start menu is one of the nifty components of Windows 11 as it gives quick access to apps and programs installed on the device accompanied by various features. And if the Start menu stops working in Windows 11, then it might affect your working experience. Start menu not working in Windows 11 is not a new error, it’s one of the common errors since Windows 7 and Windows 10 that users face. There are various versions of this issue which are as follow:
Start menu not opening in Windows 11Start menu not showing in Windows 11Start menu won’t open in Windows 11Start menu crashes when opening in Windows 11Start menu not visible correctly in Windows 11Start menu freezes in Windows 11
Fix – Start menu not working in Windows 11
If you made up to this blog post, then it is highly possible that you’re facing one of the issues opening the Start menus in Windows 11. To help you out we decided to cover this blog post in which we will cover all the possible solutions to fix the issue:
Restart your PC
No matter, what issue you’re facing on your Windows 11 PC, the first thing we suggest you is to reboot your device. On the basis of our personal experience, 90% of the issues are fixed just by performing a quick reboot. For that, click on the Start button, then click the Power button and then from the menu select Restart. So this quick troubleshooting is worth trying.
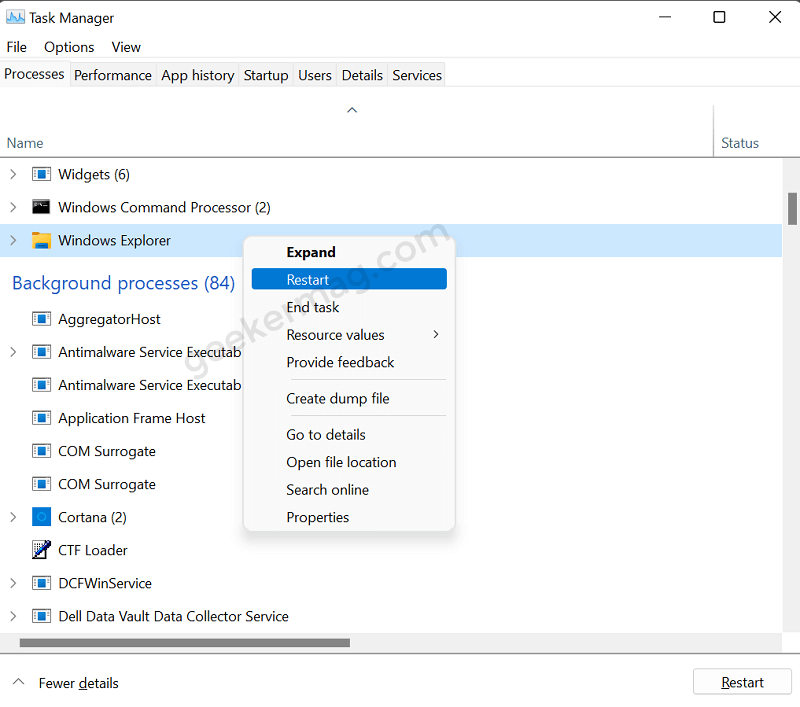
Restart Windows Explorer
You can try to Restart Windows Explorer to fix the Start menu issue in Windows 11. The majority of users suggested doing this fixes the issue for them. The start menu is a part of the Windows Explorer service so when you restart Windows Explorer, it gives a push start to Start menu. Check out, how to restart File Explorer in Windows 11
Remove Third-Party Apps that modify the Start menu
There are the majority of third-party apps and programs available on the web using which users can quickly customize the Start menu according to their choice. In case, you’re any program, then try to remove it and check if this fixes the issue or not.
Re-register Start Menu in Windows 11
Re-register Start menu is like reinstalling the Start menu in Windows 11. If none of the methods discussed above fix the issue for you, then you can try this. Here’s how you can do that: Launch Windows Terminal. For that, right-click on the Start menu and then from the menu select Windows Terminal (Admin). When the UAC dialog box appears, click Yes to continue. Here, you need to copy-paste this command: Get-appxpackage -all shellexperience -packagetype bundle |% {add-appxpackage -register -disabledevelopmentmode ($_.installlocation + “\appxmetadata\appxbundlemanifest.xml”)} And hit enter. Let the command do its work. Once done, reboot your computer to apply the changes. After that, check if this fixes the issue.
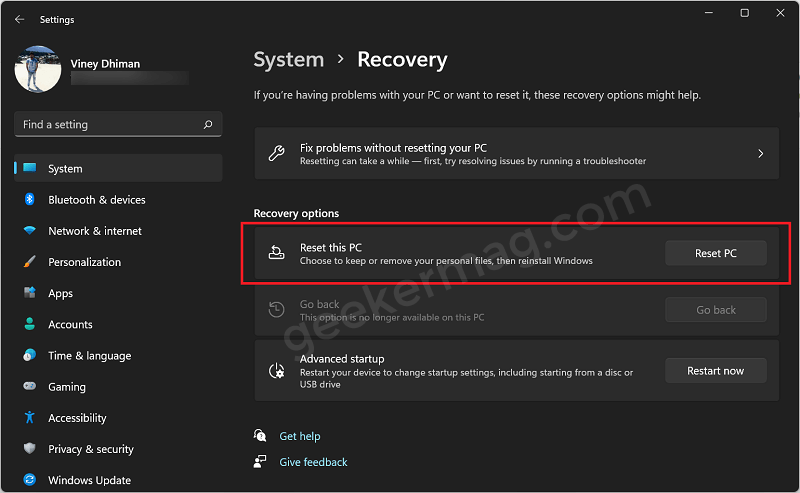
Reset your device
There is no need to explain what resetting your device does. So here’s how you can do that to that: Launch Settings app > System > Recovery > Reset. Here, click on Reset PC button and follow on-screen instructions. The process will take around 20-30 minutes. Once done, your device will start from factory settings. So it’s highly possible that your issue is fixed.
In-Place upgrade
Another nifty troubleshooting to fix issues related to the Start menu is by performing an in-place upgrade. In this method, we will make use of the latest version of Windows 11 ISO to repair Windows 11 installed on your device. The method again has a 99% resolution rate. Check out – How to Perform In-Place Upgrade in Windows 11
Check Microsoft Blog if its bug
Sometimes it’s a common bug that appears after Microsoft release cumulative update for Windows 11 and people all across the globe are facing it. In this situation, the best solution is to remove problematic Windows update or wait till Microsoft release another update with a fix. It’s because even a clean installation of Windows 11 won’t fix the issue.
Uninstall Problematic Update
According to various users, after installing Cumulative updates for Windows 11 10.0.22000.100 KB5004300, the start menu issue starts appearing. In this situation, Uninstall this update. Here’s how you can do that: Launch Settings > Windows Update > Update History. Here, scroll down to the bottom of the page and click Uninstall updates. It will take you to Uninstall Update in Control Panel. Here, look for the same update and uninstall it. In case, Start menu issue appears after installing any other update, then following the same procedure uninstall it. So these are a popular solution that helps the majority of users in fixing the Start menu not working in the Windows 11 issue. Why don’t you try these methods and let us know which method works for you? In case, you know any solution and hack that worked for you, then feel free to share with us in the comments.